
The Neapolitan Pizza Dough always starts with the water, whether this be for technical or traditional reasons. So which water is best to use? Even tap water is fine – if it is potable of course.
The first times making this dough it is better to keep everything standard, so this way it is easier to learn to make adjustments or any modifications.
After a while, it will become habitual to be able to “feel” the consistency and elasticity of the dough in your hands and knowing if it is correct.
The Authentic Neapolitan Pizza Dough
Pizza Dough
March 30, 2017
: 5 Dough of 300gr each
: 11 hr 12 min
: Moderate
Ingredients
- 0.5 Liter of Water
- 3 gr of Fresh Yeast or 1 gr of Dry Yeast
- 850 gr of 00 Flour or other type of Medium Strength Flour
- 25 gr salt
Directions
- Step 1 Pour all the water in a large mixing bowl.
- Step 2 Add the yeast and turn with a spoon until it has completely melted. Do the same with the salt, stir it vigorously with a spoon in a separate container with with about four five tablespoons of the water (best if this is room temperature to luke-warm) until it has completely dissolved.
- Step 3 Gradually add a little less than half of the flour, mixing it in with the yeast and water until it has obtained a smooth homogeneous cream-like texture.
- Step 4 Now add in the salt water mixture, mixing it thoroughly in the dough to make it blend in with the dense mixture and melt into it.
- Step 5 Use the electric mixer during this phase of the dough process. It quickly and incorporates the flour and the water together in a smooth silky textured cream without all the mess. However, true pizza dough is done with the hands, so this may be a heresy for traditional pizza makers! If the dough is mixed right away when it is most “hydrated,” this will enable the eventual lumps that form to gradually disappear. If you wait until the dough “cream” is more pasty and dense, this will cause the chains of gluten to be more consistent (but remember to not overdo it! With this type of dough, the process of “agglutination” is not accelerated, but the contrary!).
- Step 6 Now the true dough-making process commences: Add in the flour little by little, by fistfuls, over the mixture. The dough’s density will increase. Now the mixing action becomes more intense as both hands will be occupied. With one hand turn the bowl, while with the other, scoop the dough from the bottom inwards, in an enveloping movement.
- Step 7 This movement should be strong and graceful, and does not “crush” the dough, but “motivates” it to rise. These two movements done together increase the density and allows for the gluten to form its nice web within the composition.
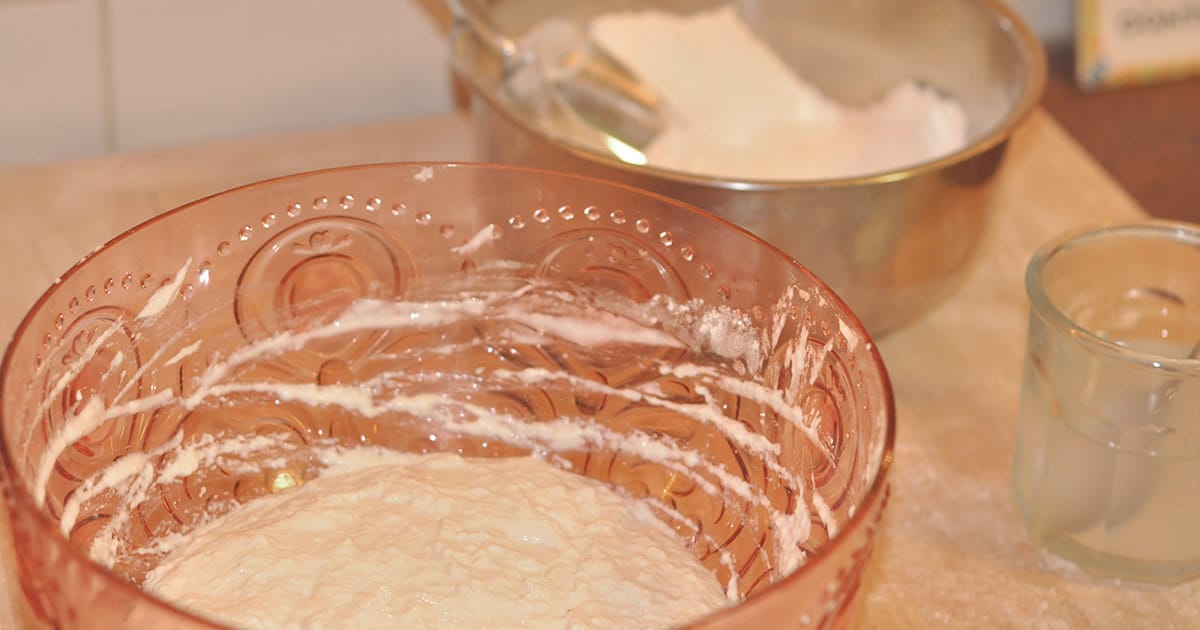
- Step 8 IMPORTANT: Here follows the part where caution must be used. When the dough has reached a certain plastic consistency, but it still sticky, it is pertinent to reduce the flour you use. This is because when the dough toughens, contrary to what is thought, its absorbency is reduced. It is for this reason that the flour is to be used minimally at this stage.
- Step 9 It is best to sprinkle on a bit of flour with your fingers, and follow with a lot of arm action and movement with the dough. This is to stimulate it instead of toughening it up with excess flour which will decrease the chances of it becoming elastic, which is what we want. If the dough still seems sticky after a few minutes of constant movement of being turned in the bowl, sprinkle some more flour – but sparsely. The dough will most likely still feel moist after three or four times after turning it, but the flour goes decreased in quantity each time. We are at the end: the dough is soft and smooth beneath your hands, just a little bit elastic (but not too much!), is not sticky, and finally, the bowl is “clean” from all remnants of the mixture. Now sprinkle some flour lightly on a flat smooth surface where you will then dump the mass of dough. Without poking it, shape it with circular plunging movements on the surface, then finish by rounding off the form to give it a certain uniformity.
- Step 10 Okay, well done!! Return the dough to the container and cut a cross in it, then cover it with a lid and a moistened cloth.
- Step 11 NOTE: One of the secrets to good pizza is the hydration of the dough. An optimal grade of Water absorbency is from 58 to 65% of the water. If everything has worked out as planned, there will be leftover flour. Weigh this. If it reaches to be close to 100 gr, it is sure that the dough came out as it should. Now it is time for the dough to rise, then to be cut, and shaped into individual pizza rounds.
Enjoy Our Pizza Dough!
Hi, can you please help. after mixing all the ingredients & cover, how long is the first rise, I am guessing 11 hours, (is it in a fridge for a slow rise, or at room temp.) after this, when I am shaping into dough balls, what weight are the 5 dough ball’s , is their a second rise for the dough balls, if so how long.
Thank You.
Hi Brian,
Sorry, I should add these details in the recipe.
For a 24h raise. Put the dough in the fridge in a closed container, and let it stay for 11 hours. Then out for 6h, and after doing the dough balls 4.
For the 9h raise. After mixing let it raise in a closed container for 5h and 4h after the dough balls.
I usually do the balls around the 300g, 270g to 320g.
As soon as I can I’ll update the recipe, hope all is clear if not please let me know.
Thank you and have a delicious pizza!
If you can please send me some picture of your pizza. 🙂
Thank you, yes I will send photos soon,
Regards
Brian
Hi can somebody please answer my question.
Thank you.